
How to Deter Carpenter Bees: 10 Proven Ways to Prevent Damage
Why Carpenter Bees Target Your Property
How to deter carpenter bees starts with understanding why these large, buzzing insects are drawn to your home in the first place. Here are the most effective deterrent methods:
Top Carpenter Bee Deterrents:
– Paint or stain all exposed wood – reduces nesting by up to 90%
– Apply citrus or almond oil sprays every 3-5 days during spring
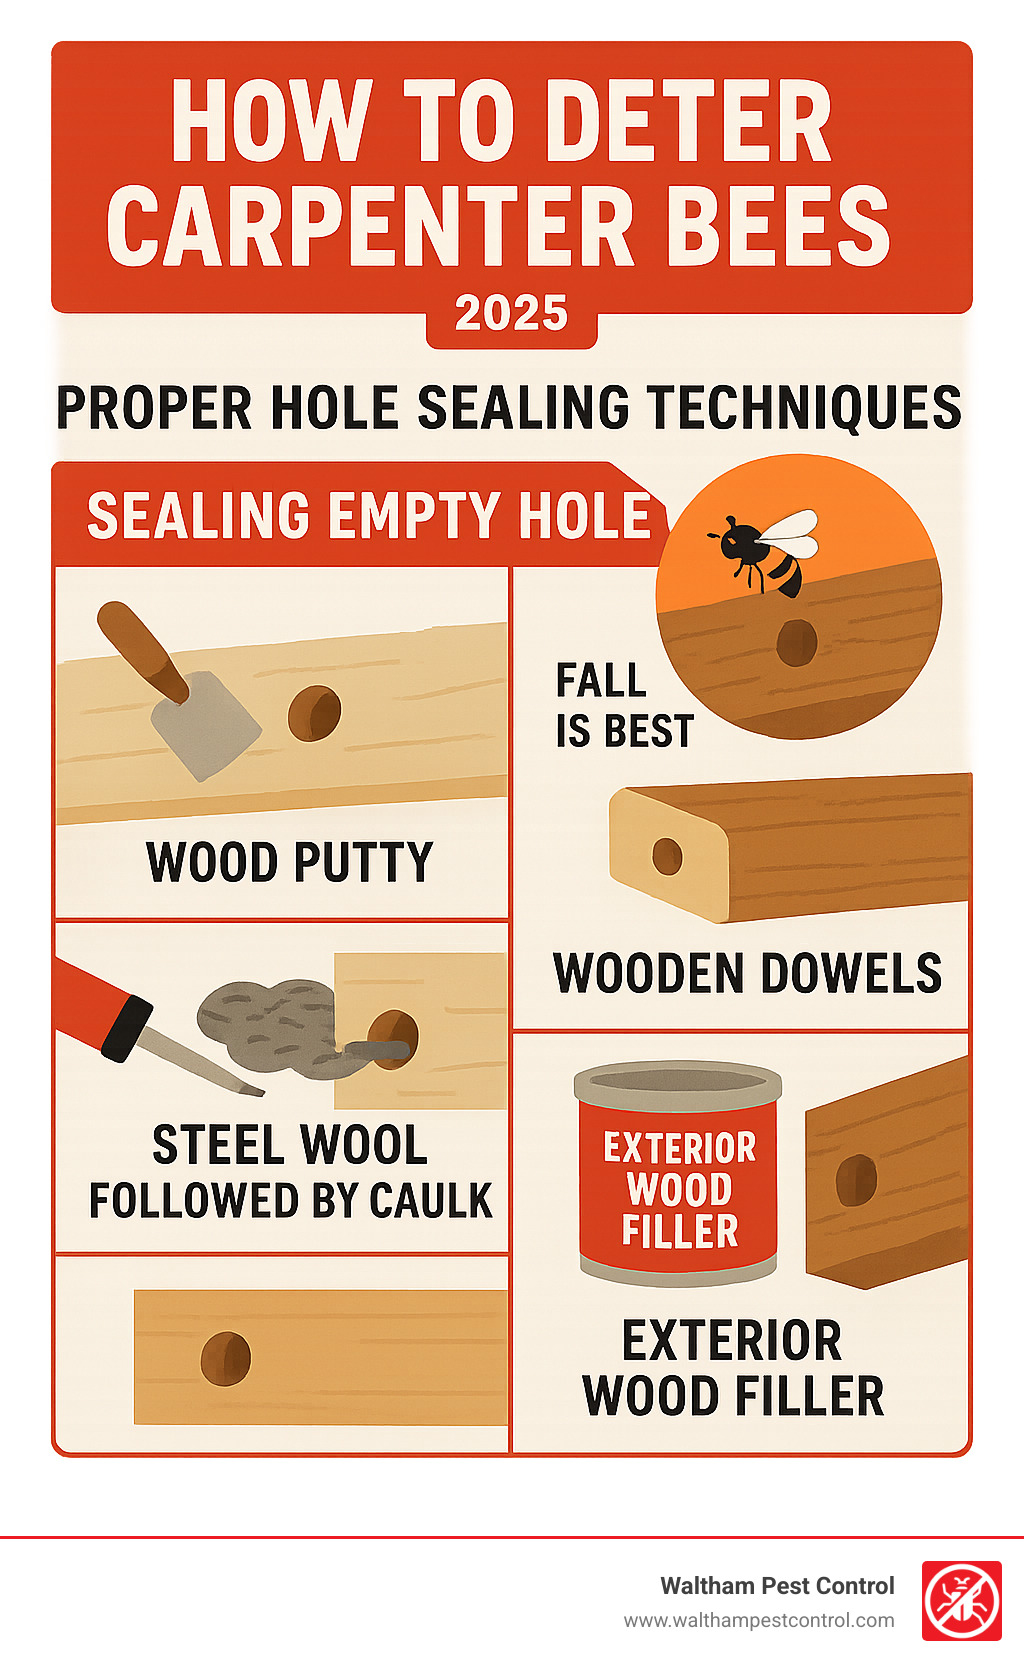
– Seal existing holes with wood putty or caulk in fall
– Use hardwood or pressure-treated lumber for new construction
– Install fake wasp nests to create territorial deterrence
– Add wind chimes or noise makers for vibration deterrence
Those perfect half-inch holes appearing in your deck railings, eaves, or fence posts aren’t random damage – they’re the work of female carpenter bees creating nests for their young. While these solitary bees are valuable pollinators, their wood-boring habits can weaken structures and create entry points for moisture and secondary pests.
Unlike aggressive wasps or swarming honey bees, carpenter bees are generally harmless to people. Males hover menacingly but can’t sting, and females rarely sting unless directly handled. However, their tunneling can extend 6-12 inches per season, with some galleries reaching up to 10 feet over multiple years.
The key to effective carpenter bee management lies in making your property less attractive to these wood-boring insects while preserving their important role in pollinating plants. Prevention beats treatment every time – especially when dealing with pests that return to the same nesting sites year after year.
As Waltham Pest Control, President & CEO of Waltham Pest Control with over 40 years of pest management experience, I’ve helped countless Massachusetts homeowners successfully implement strategies for how to deter carpenter bees while maintaining eco-friendly practices.

Key terms for how to deter carpenter bees:
– carpenter bees and pressure treated wood
– carpenter bees sting treatment
– average price of carpenter bee pest control treatment
Carpenter Bee Basics: Identification & Behavior
Picture this: you’re enjoying your morning coffee on the deck when a large, shiny black bee starts hovering around your head like a tiny helicopter. Before you panic, take a closer look – you’re probably meeting your first carpenter bee of the season.
These impressive insects are about the size of a bumblebee, measuring roughly 3/4 to 1 inch long. But here’s the key difference that’ll help you identify them: carpenter bees have shiny, hairless black abdomens that gleam like polished obsidian in the sunlight. Bumblebees, on the other hand, are fuzzy all over with their characteristic yellow and black stripes.
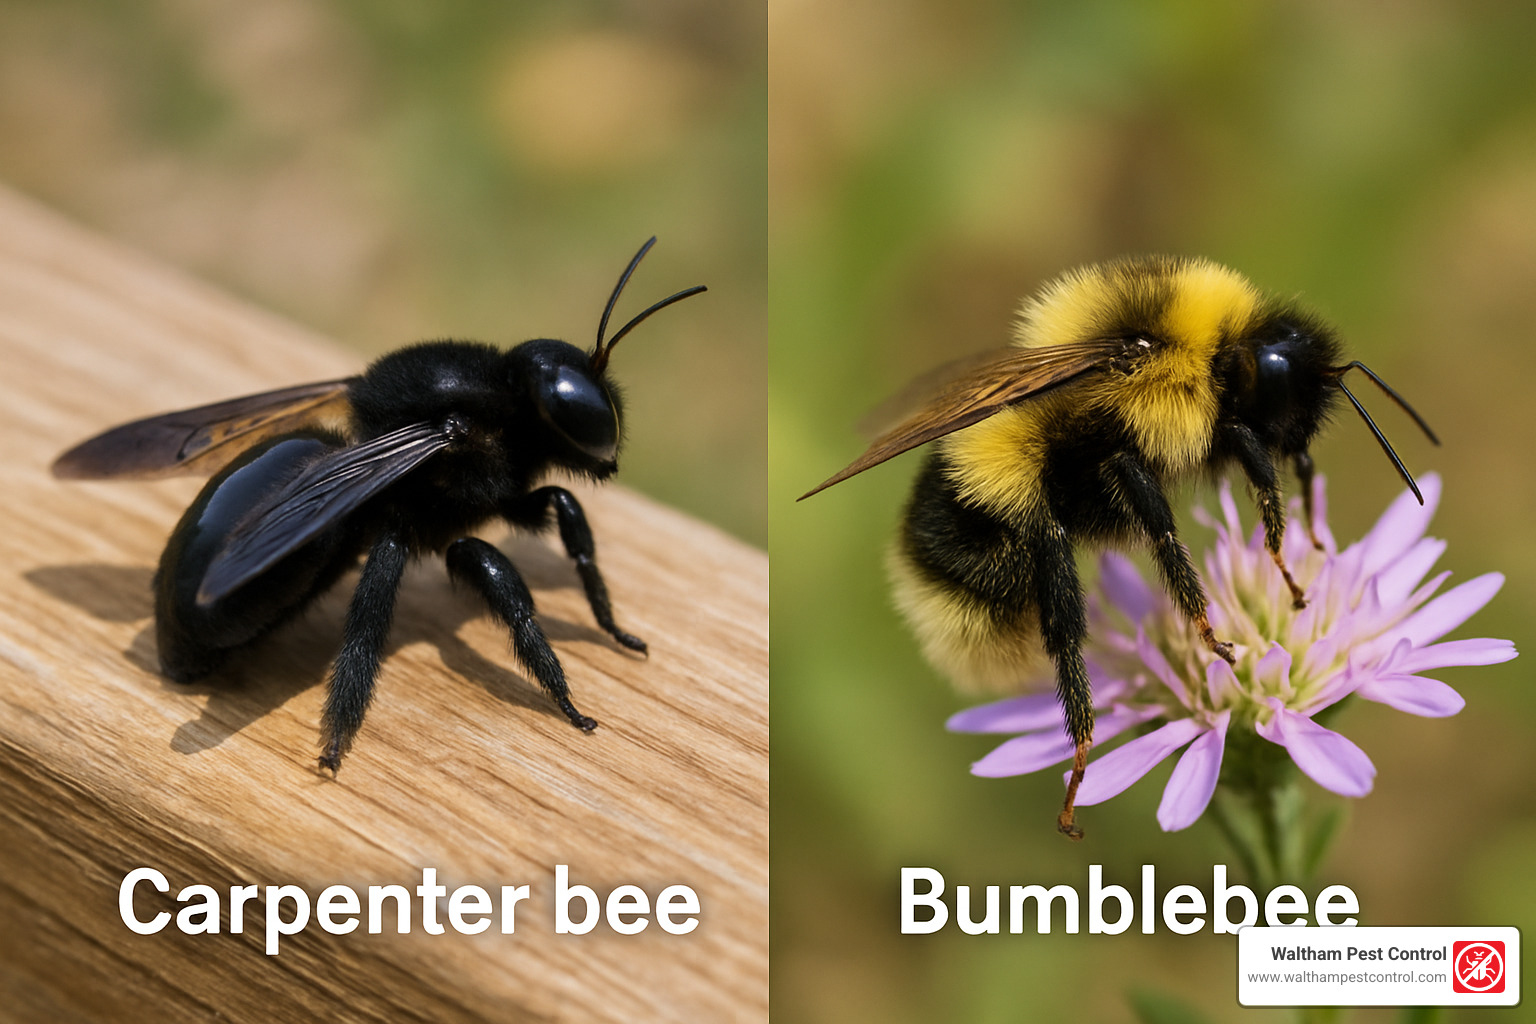
The females are the ones you need to watch out for when learning how to deter carpenter bees. They’re equipped with powerful jaws that can chew perfectly round holes – about ½ inch in diameter – straight into your wooden structures. These glossy black females are all business, focused on creating galleries where they’ll lay their eggs and stock up pollen for their babies.
Now, those hovering males that seem so aggressive? They’re basically all bark and no bite. Male carpenter bees can’t sting – they don’t even have stingers! You can spot them by their yellow facial markings and their tendency to act like tiny bouncers, patrolling their territory and diving at anything that moves.
Unlike honey bees that live in massive colonies, carpenter bees are solitary nesters. Each female goes it alone, creating her own individual nest rather than working with a group. This actually makes prevention easier since you’re dealing with individual decisions rather than hive mentality.
Here’s something that might surprise you: carpenter bees are incredible pollinators. Scientific research on carpenter bee pollination shows they use “buzz pollination” – they grab onto flowers and vibrate their flight muscles to shake pollen loose. This makes them particularly valuable for pollinating crops like tomatoes, eggplants, and blueberries.
Telltale Signs You’ve Got Carpenter Bees
Spring property inspections become more meaningful when you know what to look for. The most obvious clue is sawdust piles beneath wooden structures. This isn’t fine dust like you’d see with termites – carpenter bee frass consists of coarse wood particles mixed with pollen and bee waste.
Keep an eye out for yellow streaks radiating from small holes in your wood. These fan-shaped stains are fecal marks left by the bees, particularly noticeable on light-colored surfaces like white trim or unpainted cedar.
During peak nesting season in late spring, you might actually hear them at work. The chewing sounds are subtle but distinct – a faint scratching or gnawing noise coming from inside wooden structures.
Woodpecker activity around your property can also signal an established carpenter bee problem. These birds are excellent at finding bee larvae inside tunnels, so fresh woodpecker holes near suspicious-looking round holes often indicate a more serious infestation.
Finally, watch for repeat use of the same holes. Carpenter bees are creatures of habit, often returning to successful nesting sites year after year.
Why They Bore: Wood Preferences & Damage Potential
Carpenter bees aren’t just randomly drilling holes in your deck – they’re incredibly picky about their real estate choices. Think of them as the house hunters of the insect world, with very specific criteria for their dream home.
These industrious insects have a clear preference for untreated softwoods like pine, cedar, cypress, and redwood. They’re particularly drawn to weathered surfaces that have been kissed by sun and rain, making older decks and fences prime targets. The wood needs to be thick enough to accommodate their growing families – typically at least 2 inches thick – which explains why they love deck railings and fence posts.
Here’s the good news: carpenter bees rarely attack painted or varnished wood. It’s like putting up a “No Vacancy” sign that actually works. This is why understanding how to deter carpenter bees often starts with a simple paint job, which can reduce nesting by up to 90% compared to bare wood surfaces.
The damage potential really depends on how long the party’s been going on. A single female carpenter bee can excavate 6-12 inches of gallery per season, creating those distinctive L-shaped tunnels that follow the wood grain. But here’s where things get interesting – and potentially problematic.
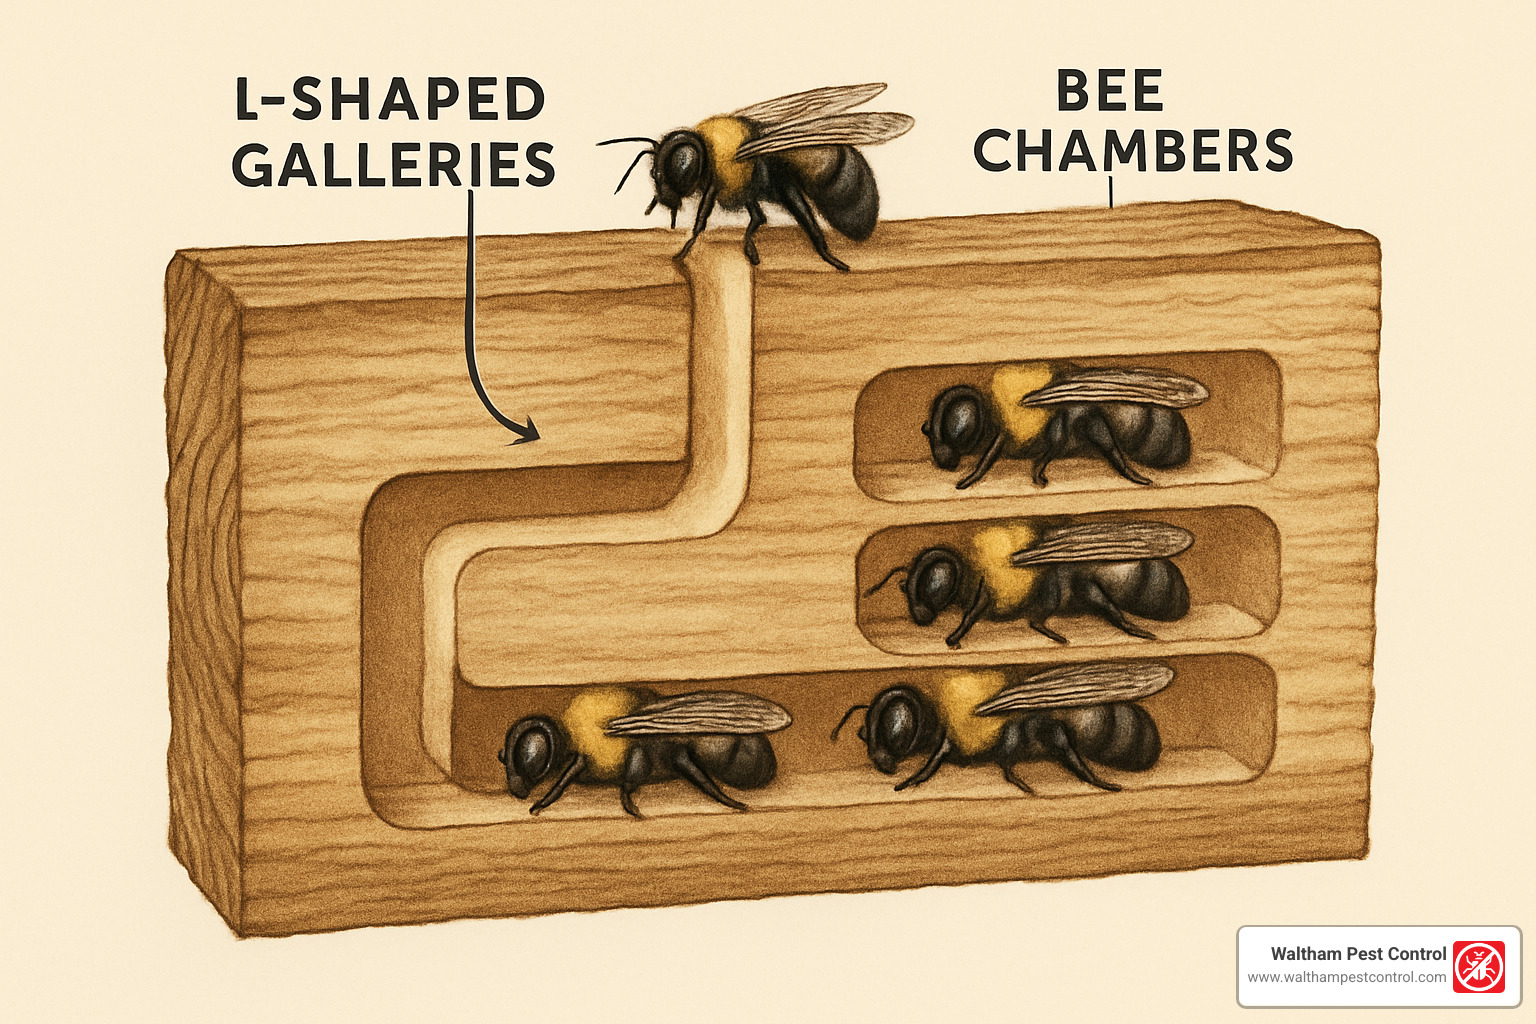
When carpenter bees find a location they love, they tend to return year after year like faithful summer residents. Multiple generations can expand the same tunnel system until galleries reach up to 10 feet in length. At that point, what started as a small cosmetic issue can become a more serious structural concern.
Most carpenter bee damage falls into the aesthetic rather than structural category. Unlike termites, these bees don’t actually eat the wood – they’re just moving it out of the way to create nurseries. However, extensive tunneling over multiple seasons can weaken wooden components, especially in smaller structural elements like railings and trim boards.
The real trouble often comes from secondary problems that follow the initial bee activity. Those perfectly round holes create highways for moisture to enter the wood, leading to rot and decay around tunnel entrances. The holes also attract other wood-boring insects who see the carpenter bee’s hard work as a convenient starting point.
Moisture intrusion through unsealed holes is perhaps the most serious long-term consequence. Water damage and wood rot can compromise structural integrity far more than the original bee tunnels ever could. Add in the staining from bee waste products and potential woodpecker damage when birds find the protein-rich larvae inside, and you’ve got a cascade of problems stemming from that first innocent-looking hole.
Surfaces Most at Risk
After four decades of serving Eastern Massachusetts communities, we’ve noticed that carpenter bees have definite favorites when it comes to nesting locations. Eaves and fascia boards top the list – these horizontal surfaces get plenty of sun exposure and are often made from untreated softwood.
Deck railings and support posts are another hot spot, especially when they’re constructed from untreated lumber. The combination of accessibility, appropriate wood thickness, and weathered surfaces makes them irresistible to female carpenter bees.
Pergolas and arbors present multiple opportunities with their numerous wood joints and overhead positioning. Don’t overlook fence rails, children’s playsets, and outdoor furniture either. The good news is that painted or stained surfaces, hardwood construction, and pressure-treated lumber are much less appealing to carpenter bees.
How to Deter Carpenter Bees: Proven Prevention Strategies
The secret to successful carpenter bee management isn’t just one magic bullet – it’s combining the right strategies at the right time. Think of it like weatherproofing your home: you wouldn’t rely on just paint or just caulk, but together they create a fortress against the elements.
Painting remains your strongest defense against carpenter bees, reducing nesting activity by up to 90%. These bees are surprisingly picky about their real estate choices, and they strongly prefer raw, untreated wood over painted surfaces. When applying paint, don’t skimp on quality or coverage. Two coats provide maximum protection, and pay extra attention to those vulnerable spots where end grain shows or boards meet at joints.
Solid-color stains offer an excellent middle ground if you love seeing wood grain but want serious protection. They penetrate deeper than paint and typically outlast it on horizontal surfaces that take a beating from sun and rain. You’ll get about 75-85% reduction in carpenter bee activity with quality stain.
Clear sealers provide the least protection but still make your wood less appealing to these particular tenants. The sealed surface becomes harder to penetrate, though you’ll need to reapply every 2-3 years to maintain effectiveness.
| Treatment Type | Protection Level | Durability | Appearance |
|---|---|---|---|
| High-Quality Paint | 90% reduction | 5-7 years | Solid color coverage |
| Solid-Color Stain | 75-85% reduction | 4-6 years | Wood grain visible |
| Clear Sealer | 40-60% reduction | 2-3 years | Natural wood look |
When you’re building new or replacing damaged wood, your material choices can eliminate problems before they start. Hardwoods like oak, maple, and ash are naturally resistant – carpenter bees find them too tough to excavate easily. Pressure-treated lumber contains preservatives that make bees think twice about setting up shop. For areas where you don’t need the structural properties of wood, composite materials eliminate the problem entirely.
Don’t overlook the small stuff that makes a big difference. Caulk and fill every crack, gap, and nail hole before they become carpenter bee starting points. These industrious insects often begin their excavation at existing imperfections in the wood.
Timing makes all the difference in prevention success. Apply surface treatments in early spring (March-April) before nesting season kicks into high gear. Use late fall (October-November) for sealing abandoned holes and performing maintenance when the bees have moved on.
Natural Repellents That Work (how to deter carpenter bees)
For homeowners who prefer gentler approaches to how to deter carpenter bees, several natural repellents consistently deliver results without harsh chemicals.
Citrus oil spray creates a powerful deterrent that’s safe for your family and pets. Boil citrus peels from lemons, limes, oranges, or grapefruits in water for 15 minutes, then strain the liquid. Spray this mixture directly onto wood surfaces every 3-5 days during active season. The oils interfere with carpenter bees’ ability to detect suitable nesting sites.
Almond oil treatment offers another effective natural option. Mix sweet almond oil or almond extract with water to create a spray that you can apply to existing holes and vulnerable wood surfaces. Some homeowners report that almond oil actually encourages bees to abandon active nests.
Peppermint oil provides a strong scent that masks the wood odors carpenter bees find attractive. Mix 10-15 drops of peppermint essential oil per cup of water and focus your applications on areas with previous activity.
Always test natural oils on a small, hidden area first to check for staining or damage. Reapply every 3-5 days or after rain, and remember to spray the wood surfaces rather than flowering plants. These approaches align perfectly with bee-friendly deterrent practices that emphasize coexistence over elimination.
Using Noise, Vibration & Visual Decoys (how to deter carpenter bees)
Carpenter bees might look tough, but they’re surprisingly sensitive to disturbances. This sensitivity opens up creative opportunities for deterrence that don’t involve chemicals or major construction projects.
Wind chimes create constant movement and sound vibrations that make areas less appealing for nesting. Hang metal chimes near vulnerable wood structures – they work better than wood or bamboo versions because they create more consistent vibrations.
Loud music or speakers provide temporary but effective deterrence during peak nesting activity. Playing music near active sites can actually drive bees to abandon tunnels they’ve already started.
Fake wasp nests tap into carpenter bees’ natural instinct to avoid territorial competition. Paper bag decoys or commercial fake nests hung under eaves and near previous nesting sites add another layer of deterrence.
Motion decorations like reflective tape, pinwheels, or other moving elements create visual disturbances that discourage nesting. The key is consistent movement that makes the area feel busy and unsuitable for raising young.
Most sound and visual deterrents work within about 15 feet of placement, so you’ll need multiple installations for larger structures. These methods work best when combined with sealing and surface treatments for comprehensive protection.
Repair, Trap, or Call a Pro? Smart Response Plans
So you’ve spotted those telltale holes despite your best prevention efforts? Don’t panic. You have several options for dealing with active carpenter bee problems, and the right choice depends on how extensive the damage is and what you’re comfortable tackling yourself.
DIY carpenter bee traps can be surprisingly effective when you’re dealing with a manageable population. The classic design is beautifully simple – take a piece of 4×4 lumber, drill a 15/16-inch hole about 5 inches deep, then connect it to a mason jar underneath. The bees fly up into the angled holes but can’t figure out how to steer back out.
The trick with traps is proper placement. Hang them within 15 feet of where you’ve seen activity, especially in eaves and overhangs where carpenter bees naturally patrol. You’ll need to empty or replace the traps regularly during active season.
Fall is your friend when it comes to sealing empty holes. Once the bees have vacated for the season, you can repair the damage without disturbing active nests. Wood putty works great for small holes in painted surfaces, while wooden dowels cut flush look more natural on stained wood. For larger openings, try steel wool followed by caulk – it creates a barrier that’s tough for bees to penetrate next season.
Sometimes homeowners ask about insecticidal dust as a last resort. While it can be applied directly into tunnels, this approach comes with significant downsides. You risk harming beneficial pollinators, creating safety concerns for pets and children, and potentially causing environmental impact on species you want to protect.
When you’re researching options, you’ll find that professional carpenter bee treatments vary widely in cost. Based on internet data, average treatments range from $150 to $900 or more – that’s quite a spread because every situation is different. Property size, extent of infestation, and regional factors all play a role in pricing.
For more detailed information about treatment approaches, our home treatment for carpenter bees resource page covers additional strategies and considerations.
When Professional Help Makes Sense
There are definitely situations where calling in the pros makes more sense than going it alone, and recognizing these scenarios can save you time, money, and frustration.
Multiple seasons of damage is a big red flag. If carpenter bees keep coming back to the same spots year after year, you’re probably dealing with established galleries that need comprehensive treatment.
High ladders and eaves work can be genuinely dangerous. We’ve seen too many homeowners take unnecessary risks trying to reach problem areas on steep roofs or tall structures.
When you find extensive tunneling – galleries that run deep into structural members or affect multiple building components – professional assessment becomes crucial. What looks like minor damage on the surface might be more serious underneath.
Sensitive occupants also tip the scales toward professional treatment. Homes with young children, elderly residents, or family members with respiratory conditions benefit from targeted approaches that minimize chemical exposure while still solving the problem effectively.
Perhaps most importantly, professionals understand how to deter carpenter bees while balancing pollinator health. We can implement strategies that address your specific problem areas without unnecessarily harming the beneficial insects your garden depends on.
At Waltham Pest Control, we bring over 40 years of experience to carpenter bee management throughout Eastern Massachusetts. Our approach focuses on long-term solutions rather than quick fixes that create recurring problems.
For detailed information about our comprehensive approach to carpenter bee management, visit our Carpenter Bee Removal Services in Waltham, MA page.
Frequently Asked Questions About How to Deter Carpenter Bees
After helping hundreds of Massachusetts homeowners tackle carpenter bee problems, I’ve noticed the same questions come up repeatedly. Let me share the answers that matter most when you’re figuring out how to deter carpenter bees effectively.
What time of year should I apply deterrents?
Timing makes all the difference in carpenter bee prevention. Spring application during March and April gives you the biggest bang for your buck because you’re getting ahead of the problem rather than chasing it.
This is when female carpenter bees emerge from winter hiding spots and start house-hunting for the perfect nesting site. If your wood surfaces are already protected with fresh paint, stain, or natural repellents, these industrious ladies will likely move on to more appealing (unprotected) wood elsewhere.
Fall treatment from October through November focuses on cleanup and prep work. This is your chance to seal up any holes the bees have abandoned for the winter and apply fresh surface treatments before harsh weather sets in.
Can painted wood still get carpenter bees?
Here’s some good news: painting reduces carpenter bee nesting by approximately 90% compared to bare wood. That’s pretty impressive protection for the cost of a few gallons of paint and some elbow grease.
But yes, painted wood can occasionally still attract carpenter bees, especially where the paint has gotten thin or damaged. I’ve seen it happen around nail heads, at joint connections, and on surfaces that take a beating from weather. The bees seem to have a sixth sense for finding those vulnerable spots.
The key is staying on top of paint maintenance. A quick spring inspection can catch problem areas before they become bee highways.
Will essential-oil sprays harm other pollinators?
This is such a thoughtful question, and I appreciate homeowners who want to protect the good guys while deterring the wood-borers. Natural repellents like citrus and almond oils have low toxicity to most beneficial insects when you use them correctly.
The secret is in the application method. Apply repellents directly to wood surfaces rather than spraying them willy-nilly around your garden. You’re trying to mask the wood scents that attract carpenter bees, not create a no-fly zone for every pollinator in the neighborhood.
Avoid spraying essential oils on flowering plants where beneficial bees, butterflies, and other pollinators are actively foraging.
How long do carpenter bee deterrents last? Surface treatments like quality paint and solid stain typically protect for 4-7 years, depending on how much weather they face. Natural repellents need refreshing every 3-5 days during active season.
Do carpenter bees return to the same holes? Absolutely, which is why sealing abandoned holes in fall is so important. These bees are creatures of habit, and an existing tunnel is like a luxury condo compared to starting from scratch.
Are carpenter bees active at night? Nope, they’re strictly daytime operators. Evening hours are perfect for applying treatments or sealing holes without any buzzing interference.
Conclusion
Successfully learning how to deter carpenter bees comes down to one simple truth: prevention beats treatment every time. These fascinating insects aren’t trying to destroy your deck or damage your home – they’re just following millions of years of instinct to find the perfect nursery for their young.
The good news? You now have a complete toolkit for keeping them happy while protecting your property. Painting or staining your wood surfaces remains your strongest defense, reducing nesting activity by up to 90%. Add some citrus oil sprays during peak season, seal up old holes each fall, and hang a few fake wasp nests around vulnerable areas – suddenly your home becomes far less appealing to prospective carpenter bee mothers.
These are valuable pollinators that help our gardens and local ecosystems thrive. The goal isn’t to wage war against them but to simply encourage them to set up shop somewhere other than your beautiful deck railings or pergola posts.
Timing makes all the difference in carpenter bee management. Spring preparation before they start house-hunting gives you the upper hand. Fall maintenance after they’ve moved on ensures you’re ready for next year. It’s like any home maintenance routine – a little attention at the right times prevents big headaches later.
Sometimes, despite your best efforts, carpenter bees find ways to outsmart your defenses. Multiple years of damage, extensive tunneling, or hard-to-reach areas under high eaves might call for professional help. That’s where our four decades of experience serving Eastern Massachusetts comes in handy.
At Waltham Pest Control, we’ve helped countless homeowners from Burlington to Boston find that sweet spot between protecting their property and preserving beneficial insects. Our professional inspection ensures safe, lasting results that work with nature rather than against it.
Don’t let carpenter bee concerns keep you up at night or stop you from enjoying your outdoor spaces. Whether you tackle prevention on your own or bring in professional backup, the key is taking action before small problems become big ones.
Ready to reclaim your deck and protect your investment? Contact Waltham Pest Control for custom carpenter bee prevention and remediation that fits your specific situation and budget. We’ll help you create a comprehensive plan that keeps both you and the bees happy.
For more information about our complete approach to keeping your home pest-free, explore our residential pest solutions page. Your peaceful, bee-free outdoor living space is just a phone call away.
