
Understanding Carpenter Bee Infestations
Home treatment for carpenter bees begins with identifying the problem and applying the right solutions. Here’s a quick overview of effective home treatments in 2025:
- Citrus oil spray – Mix citrus oil with water and spray on affected areas
- Wood sealing – Paint or varnish exposed wood surfaces
- Insecticidal dust – Apply dust directly into nest holes
- Almond oil mixture – Combine with water and spray as a natural deterrent
- Carpenter bee traps – Set up near infested areas
- Sound vibrations – Play music or create noise near nests
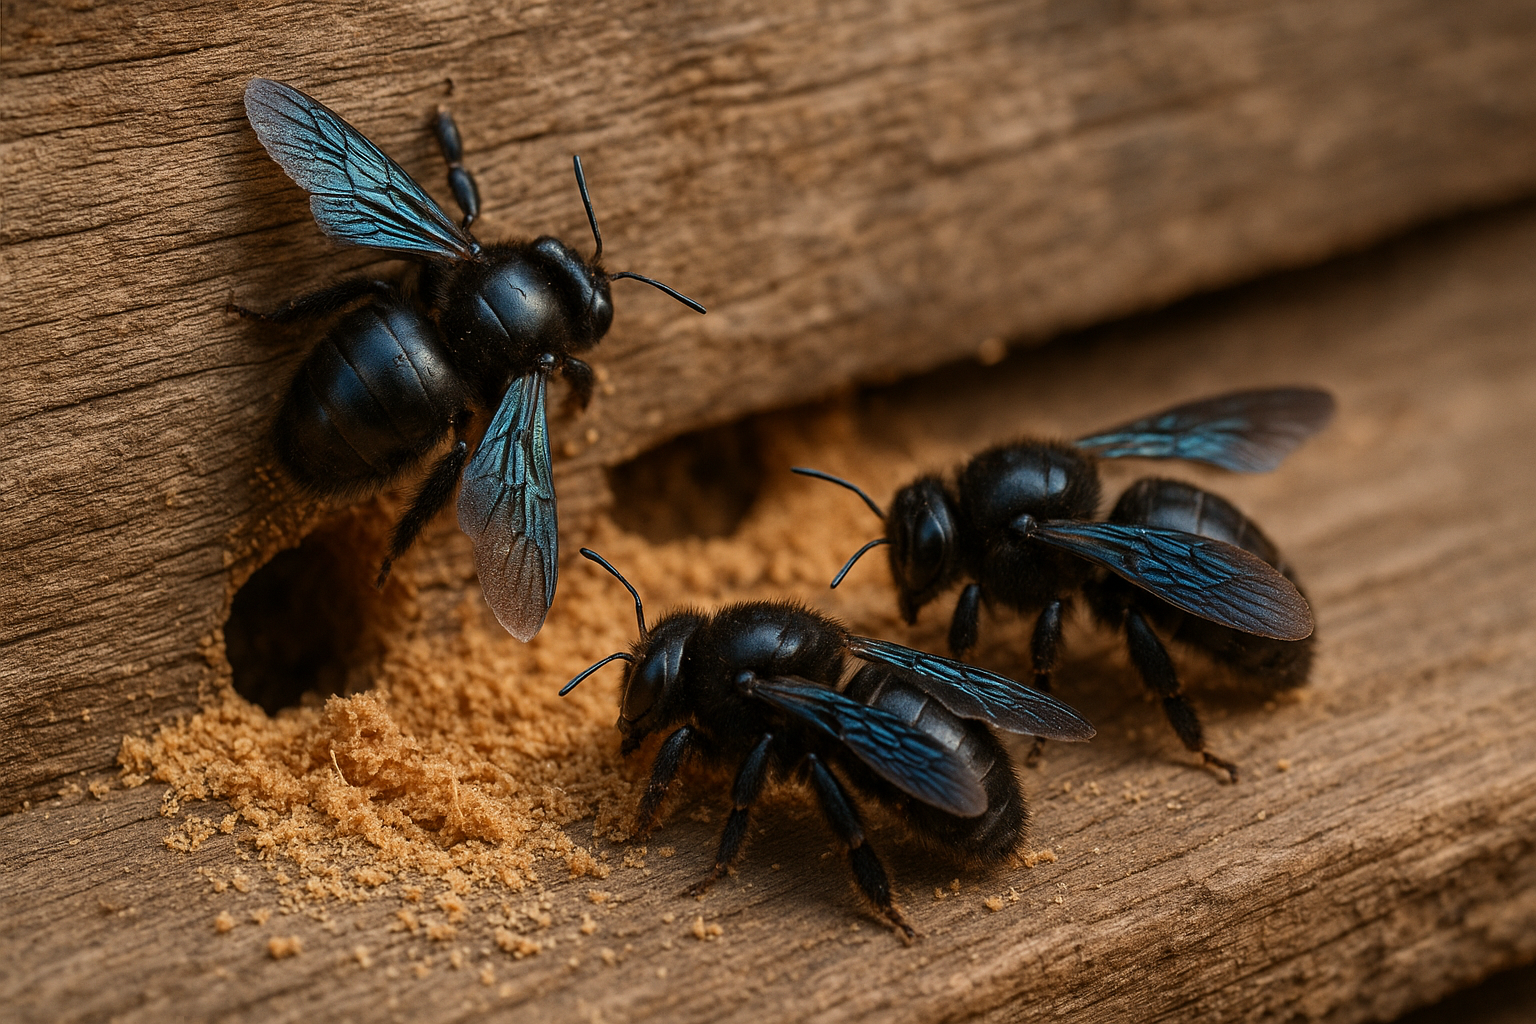
Carpenter bees are large, solitary insects that can cause significant damage to wooden structures around your home. Unlike termites or carpenter ants, they don’t eat wood—instead, they bore perfectly round holes about ½ inch in diameter to create nesting galleries. While they’re beneficial pollinators, their drilling can lead to water damage, decay, and structural weakening if left untreated.
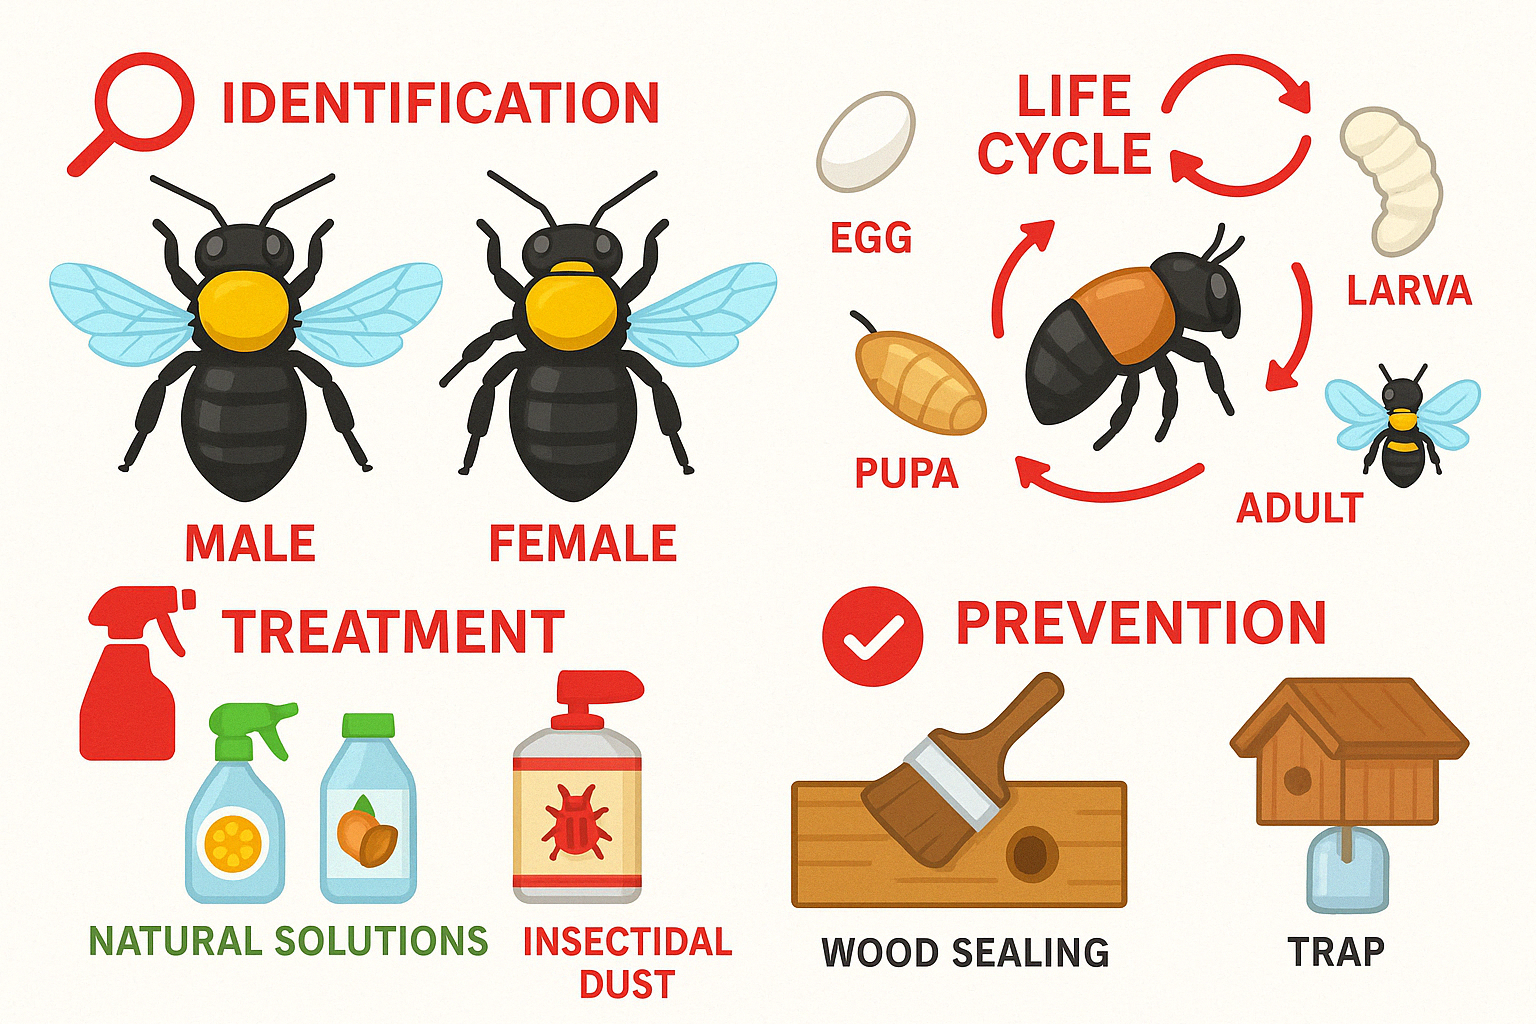
The female carpenter bees do all the drilling work, creating tunnels that can extend up to 4 feet long. Males, recognizable by their yellow facial markings, can’t sting but might intimidate you with aggressive hovering. Females have stingers but rarely use them unless directly handled.
I’m Waltham Pest Control, President & CEO of Waltham Pest Control with over 40 years of experience developing effective home treatment for carpenter bees solutions that protect Massachusetts properties from structural damage while respecting these important pollinators.
Quick home treatment for carpenter bees definitions:
– average price of carpenter bee pest control treatment
– carpenter bees sting treatment
Understanding Carpenter Bees
When you spot a large bee hovering around your porch or deck, you might be dealing with a carpenter bee. These impressive insects belong to the genus Xylocopa and are among the largest native bee species in the United States, measuring between 5/8 to 1 inch in length. Despite their intimidating size and buzz, they play a crucial role in our ecosystem.
“Carpenter bees are generally considered beneficial insects because they help pollinate various crop and non-crop plants,” according to entomologists at the University of Maryland. This ecological benefit is worth keeping in mind when you’re figuring out how to manage these wood-boring visitors.
What makes carpenter bees stand out from their cousins is their unique nesting behavior. Unlike honey bees that build hives or bumblebees that nest in the ground, carpenter bees are loners. They create individual nests by drilling perfectly round holes into wood – a behavior that gives them their name and, unfortunately, can lead to headaches for homeowners across Massachusetts, from Boston to Lowell to Salem.
Identifying Carpenter Bees
Telling carpenter bees apart from other bees is your first step toward effective home treatment for carpenter bees in 2025. These insects are commonly mistaken for bumblebees because of their similar size, but there are clear differences once you know what to look for:
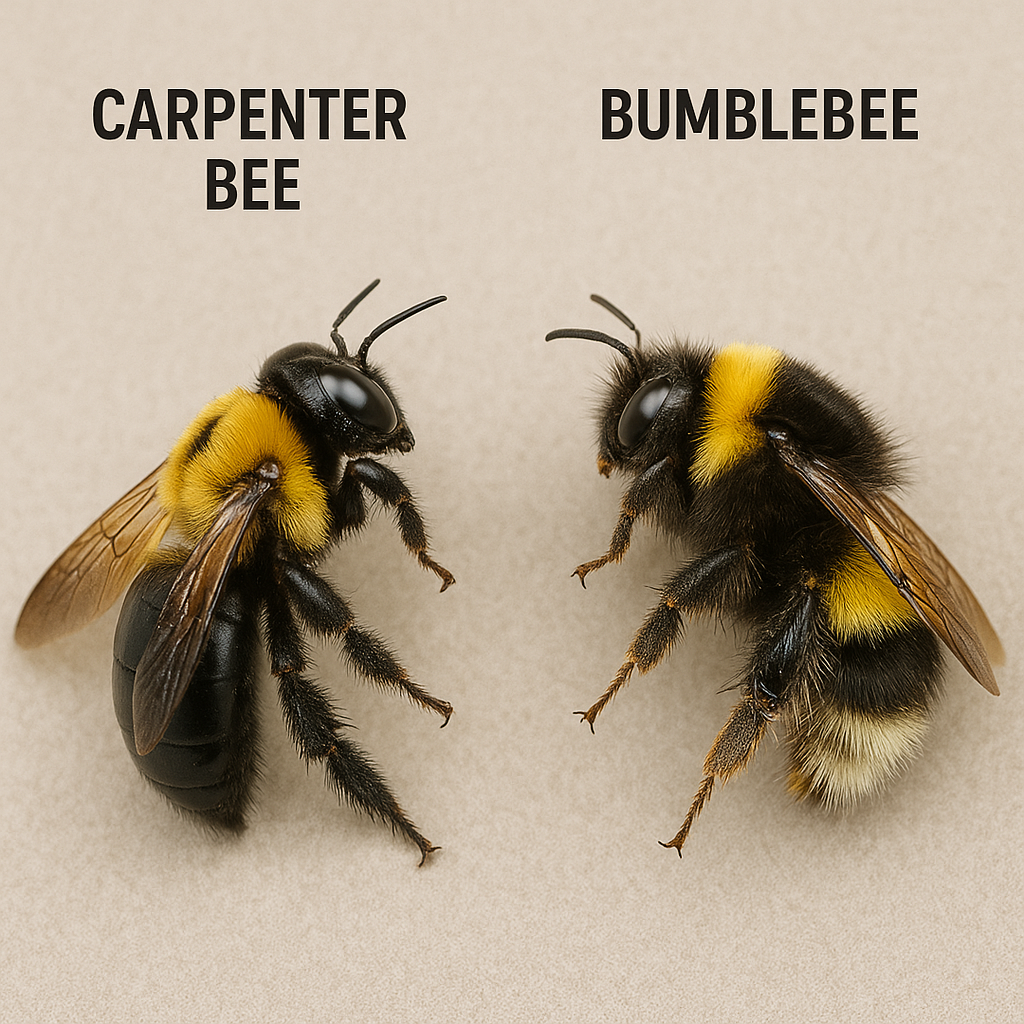
The most obvious difference is the abdomen – carpenter bees have a shiny, hairless black abdomen that sometimes gleams with a metallic blue sheen in the sunlight. Bumblebees, on the other hand, have fuzzy, hairy abdomens typically marked with yellow bands. While both are robust insects measuring about 1/2 to 1 inch long, this distinct abdomen difference is your best clue.
Male and female carpenter bees also look and behave differently from each other:
Males are the ones you’ll likely notice first – they sport yellow or white facial markings and can’t sting (despite their intimidating hovering). They’re like the neighborhood watch, patrolling territory around nest sites with what seems like aggressive flight patterns, though they’re all buzz and no bite.
Females have completely black faces and do possess stingers. They’re the true carpenters, responsible for boring into wood and creating nests. While they can sting, they rarely do unless directly handled or threatened.
As Wayne Robey, a homeowner from Indiana, told us: “I noticed large black bees with shiny abdomens hovering around my deck. At first, I thought they were bumblebees, but after seeing the perfectly round holes in my railings, I realized they were carpenter bees.”
Carpenter Bee Behavior and Life Cycle
Understanding when and how carpenter bees live is key to timing your home treatment for carpenter bees effectively. Their life unfolds in a predictable annual cycle:
Spring brings the awakening – around April to May, overwintered adults emerge from their wooden homes and begin the mating dance. Males hover protectively around nesting sites while females start the serious work of boring into wood.
By May and June, nest construction is in full swing. Female carpenter bees create impressive tunnels with a characteristic 90-degree turn inside the wood. These tunnels can extend from 6 inches to as much as 4 feet and include several separate brood chambers. It’s quite the architectural feat for such a small creature!
Next comes family planning – females provision each chamber with “bee bread” (a mixture of pollen and nectar) and lay a single egg before sealing the chamber. This careful preparation ensures their offspring will have all the nutrition they need to develop.
Throughout summer, eggs hatch into larvae that happily munch on their provisions. The entire development from egg to adult takes about 3 months, with new adult bees emerging in late summer. Interestingly, these new adults often remain in the nest rather than venturing out immediately.
As fall and winter approach, some adults, particularly females, hunker down in the tunnels to overwinter, ready to begin the cycle again when spring returns. According to entomologists, carpenter bees typically produce one generation per year.
What makes these bees particularly troublesome for homeowners is their preference for weathered, unpainted softwoods like redwood, cedar, cypress, and pine. They’re especially drawn to structures like eaves, rafters, fascia boards, siding, wooden shakes, decks, and outdoor furniture – all the exposed wooden parts of your home that are expensive to replace!
Even more concerning, carpenter bees are creatures of habit. They often reuse and extend existing tunnels year after year, potentially causing cumulative damage over time. This is why early detection and proper home treatment for carpenter bees is so important for protecting your property.
For more detailed scientific information about carpenter bee behavior and biology, you can check out this research from the University of Maryland Extension.
Signs of Carpenter Bee Infestation
When it comes to identifying a carpenter bee problem, knowing what to look for can save you time, money, and a lot of headaches. As I’ve seen countless times across Massachusetts homes from Quincy to Worcester, catching these wood-boring bees early means less damage to repair.
Recognizing Carpenter Bee Damage
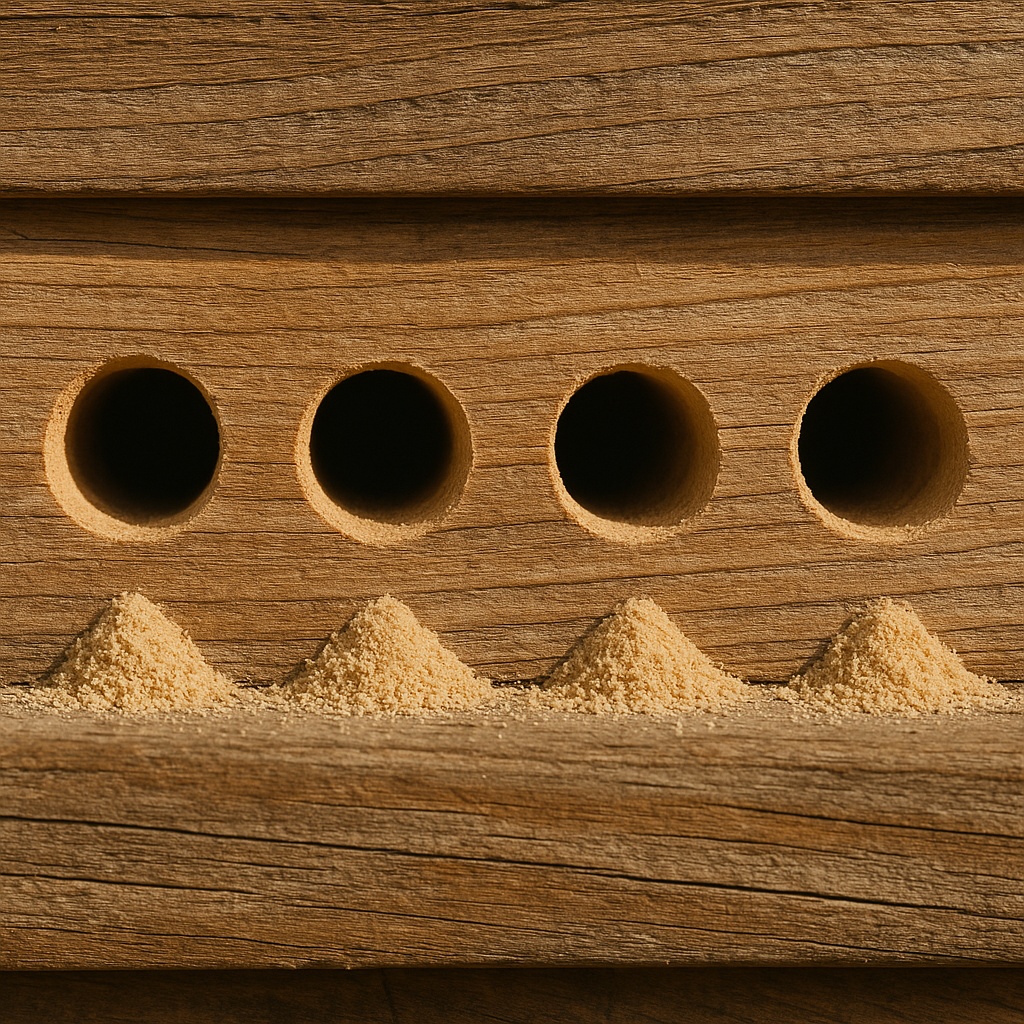
The most telltale sign of carpenter bees is their signature calling card – perfectly round entry holes about the size of your pinky finger (½ inch in diameter). These holes aren’t rough or jagged; they look almost machine-made, as if someone took a drill to your deck or fascia board.
Directly below these holes, you’ll often spot small piles of what looks like sawdust. This debris, called frass, is actually wood shavings pushed out by the industrious female bees as they excavate their tunnels. As one of our Burlington clients recently told me, “I thought someone had been doing carpentry work near my porch until I looked up and spotted those perfect circles in my railing.”
Look closely at the wood surface around and below entry holes, and you might notice yellowish stains. These aren’t just discoloration – they’re a mixture of pollen and bee waste that accumulates as the bees come and go from their nests. These stains can be particularly noticeable on lighter-colored wood.
If you’re still unsure, try this simple test: place your ear near a suspected nest hole on a warm spring day. The buzzing sounds from active bees inside the tunnels can be surprisingly loud. One Medford homeowner described it as “like having a tiny electric razor inside my porch ceiling.”
The visible bee activity itself is another clear indicator. In spring and early summer (April through June in Massachusetts), you might notice large bees hovering persistently around wooden structures. The males, though harmless, can be particularly territorial and will patrol back and forth near nesting sites.
What makes carpenter bee damage particularly concerning isn’t just what you can see – it’s what you can’t. While the entry hole might appear modest, inside the wood, tunnels can extend far beyond, running parallel to the grain. These internal galleries can stretch anywhere from 6 inches to an impressive 4 feet in length. Over multiple seasons, as new generations of bees expand existing tunnels, the cumulative damage can seriously compromise structural integrity.
Even worse, these tunnels create pathways for moisture to penetrate deeper into the wood. This often leads to wood rot and decay, multiplying the damage beyond what the bees themselves cause. During Massachusetts winters, water that seeps into these tunnels can freeze and expand, creating cracks and further weakening affected structures.
In what I call a “double whammy” scenario, woodpecker damage often follows carpenter bee infestations. These birds have an uncanny ability to detect bee larvae inside wood and will sometimes peck extensive holes to extract this protein-rich meal. I’ve seen cases where woodpecker damage created more extensive repair needs than the original bee tunnels.
As one Cambridge homeowner lamented, “I ignored a few bee holes in my gazebo last year, thinking they weren’t a big deal. This spring, I finded the entire beam was honeycombed with tunnels and starting to sag. What would have been a simple home treatment for carpenter bees turned into a major renovation project.”
Catching these signs early allows you to implement effective treatments before structural damage becomes severe. In the next section, we’ll explore exactly how you can tackle these wood-boring pests yourself with proven home remedies and treatments.
Home Treatment for Carpenter Bees
When those perfectly round holes start appearing in your wooden deck or porch, it’s time to take action. Fortunately, there are several effective home treatment for carpenter bees options that won’t break the bank or require professional help. I’ve helped hundreds of Massachusetts homeowners tackle these wood-boring pests, and I’m happy to share what works best in 2025.

Natural Home Treatments to Deter Carpenter Bees
Many homeowners prefer starting with natural solutions, especially if you’re concerned about children, pets, or the environment. I’ve seen remarkable success with these gentler approaches:
The power of citrus cannot be understated when it comes to repelling carpenter bees. These insects simply can’t stand the smell! Create your own citrus oil spray by boiling orange, lemon, or grapefruit peels in water for about 15 minutes. Once cooled and strained, transfer to a spray bottle and apply to affected wooden areas. One Lexington homeowner told me, “I was skeptical about the citrus spray, but within days, the bees completely abandoned my deck railings!”
Almond oil offers another effective natural deterrent. Mix a tablespoon with 8 ounces of water and spray wooden surfaces every few days, especially after rain. The subtle scent is pleasant to us but sends carpenter bees looking elsewhere for nesting sites.
Essential oils have shown promising results too. Tea tree, lavender, citronella, and eucalyptus oils all repel carpenter bees when diluted properly (about 20-30 drops per ounce of water) and applied to wood surfaces. A Cambridge resident shared, “I’ve been using lavender oil around my garden shed for three years now, and haven’t had a single carpenter bee hole since I started.”
For those who enjoy gardening, a garlic solution might be your answer. Simply crush several cloves, steep in water for 24 hours, strain, and spray. The potent smell dissipates quickly for humans but continues to deter bees.
Interestingly, carpenter bees are quite sensitive to vibrations. Sound deterrents like wind chimes or even playing music near their nesting areas can make them reconsider setting up home. As strange as it sounds, this method has worked for many of my clients as part of a comprehensive approach.
According to scientific research on natural repellents, these natural solutions work best as preventative measures or for very early infestations. They typically require more frequent application than chemical treatments but offer peace of mind for environmentally conscious homeowners.
Home Application of Insecticidal Dusts and Sprays
For more established infestations, you might need to step up to insecticidal treatments. When using chemicals for home treatment for carpenter bees, timing and technique are everything:
Insecticidal dusts are particularly effective because they penetrate deep into those winding galleries. Using a hand duster (available at most hardware stores), puff the dust directly into entrance holes during evening hours when bees are less active. The brilliant part? Bees will walk through the dust and carry it deeper into the nest, affecting both adults and developing larvae.
Residual sprays work well for treating the wood surface and entrance holes. Apply in the evening, focusing on areas within a few inches of each hole. For best results, reapply every 3-4 weeks during spring and early summer when carpenter bees are most active.
For those hard-to-reach tunnels, insecticidal foams can be game-changers. These products expand up to 30 times their liquid volume, filling galleries that might extend several feet into the wood. Using the straw applicator, inject directly into entrance holes to ensure complete coverage.
One critical tip from my 40 years of experience: “Wait a day or two after the treatment before sealing the tunnel to make sure all adults have been exposed to the insecticide.” This patience ensures the treatment reaches all bees in the nest, including those that may be deeper in the galleries.
Safety should always come first. Wear gloves, eye protection, and a mask when applying any insecticide. Keep children and pets away from treated areas until completely dry, and always follow label instructions carefully.
Using Carpenter Bee Traps at Home
Carpenter bee traps offer a satisfying non-toxic alternative that can be quite effective, especially when deployed early in the season:
Most carpenter bee traps look like small wooden birdhouses with angled entrance holes leading to a collection chamber—typically a clear plastic bottle or jar. The design cleverly mimics the kind of wood that carpenter bees prefer, but once they enter, they can’t find their way out.
For maximum effectiveness, mount these traps in early spring before carpenter bees become active. Place them near areas where you’ve seen activity in previous years—under eaves, near deck railings, or close to other wooden structures. Each trap has an effective radius of about 15 feet, so for larger properties, you might need several.
A clever trick I learned from a Burlington customer: “I always kick off the season by placing one dead carpenter bee inside the trap jar. It seems to attract more bees to the trap.” While slightly macabre, this method does seem to improve catch rates!
Check and empty traps regularly throughout the active season. Some homeowners report catching dozens of carpenter bees in a single season with well-placed traps.
Home treatment for carpenter bees works best when you combine multiple approaches. For instance, use natural deterrents on untreated areas, traps in high-activity zones, and targeted insecticide applications for existing nests. This integrated approach gives you the best chance of success without calling in professionals.
If your infestation is severe or you’re uncomfortable handling treatments yourself, it might be time to consider professional help. At Waltham Pest Control, we’ve been helping Massachusetts homeowners deal with carpenter bees for over four decades. You can find more info about Carpenter Bee Removal in Waltham, MA on our website.
Preventing Carpenter Bee Infestations
Let’s face it – when it comes to carpenter bees, an ounce of prevention truly is worth a pound of cure. I’ve seen countless Massachusetts homeowners breathe a sigh of relief when they find they can avoid the headache of an infestation altogether with some simple preventive steps.

Choosing the Right Materials for Your Home
The materials you select for your outdoor structures can make all the difference in keeping carpenter bees at bay. These savvy insects definitely have their preferences!
Carpenter bees are surprisingly picky about their accommodations. They strongly prefer softwoods like pine, cedar, cypress, and redwood – essentially treating these materials like five-star hotels. Hardwoods like oak, maple, and cherry naturally resist their boring attempts, making them excellent alternatives when building new structures around your property.
“I switched from pine to oak for my pergola rebuild last summer,” shares Mike from Somerville. “It cost a bit more upfront, but knowing I won’t be battling carpenter bees every spring makes it worth every penny.”
Pressure-treated lumber offers another layer of protection. The chemicals used in the treatment process naturally deter carpenter bees, making them think twice before setting up shop. For areas particularly vulnerable to carpenter bee damage, consider non-wood alternatives altogether. Vinyl or composite decking, fiber cement siding, and metal or vinyl railings provide the same functionality without serving as carpenter bee condominiums.
A contractor I spoke with in Waltham put it perfectly: “I’ve been building decks for over 20 years, and I’ve found that composite decking materials virtually eliminate carpenter bee problems. The initial cost is higher, but my clients save money in the long run by avoiding pest damage.”
Regular Home Maintenance and Inspection
Consistent maintenance is your secret weapon against carpenter bee infestations. These bees are opportunists, always on the lookout for neglected wood surfaces.
Paint or varnish serves as your first line of defense. Carpenter bees strongly prefer bare, weathered wood, so maintaining a fresh coat of paint or varnish creates a barrier they’d rather not tackle. Remember to apply your protective coating to all sides of the wood – not just the visible surfaces. Those hidden undersides are precisely where carpenter bees love to start their tunneling operations.
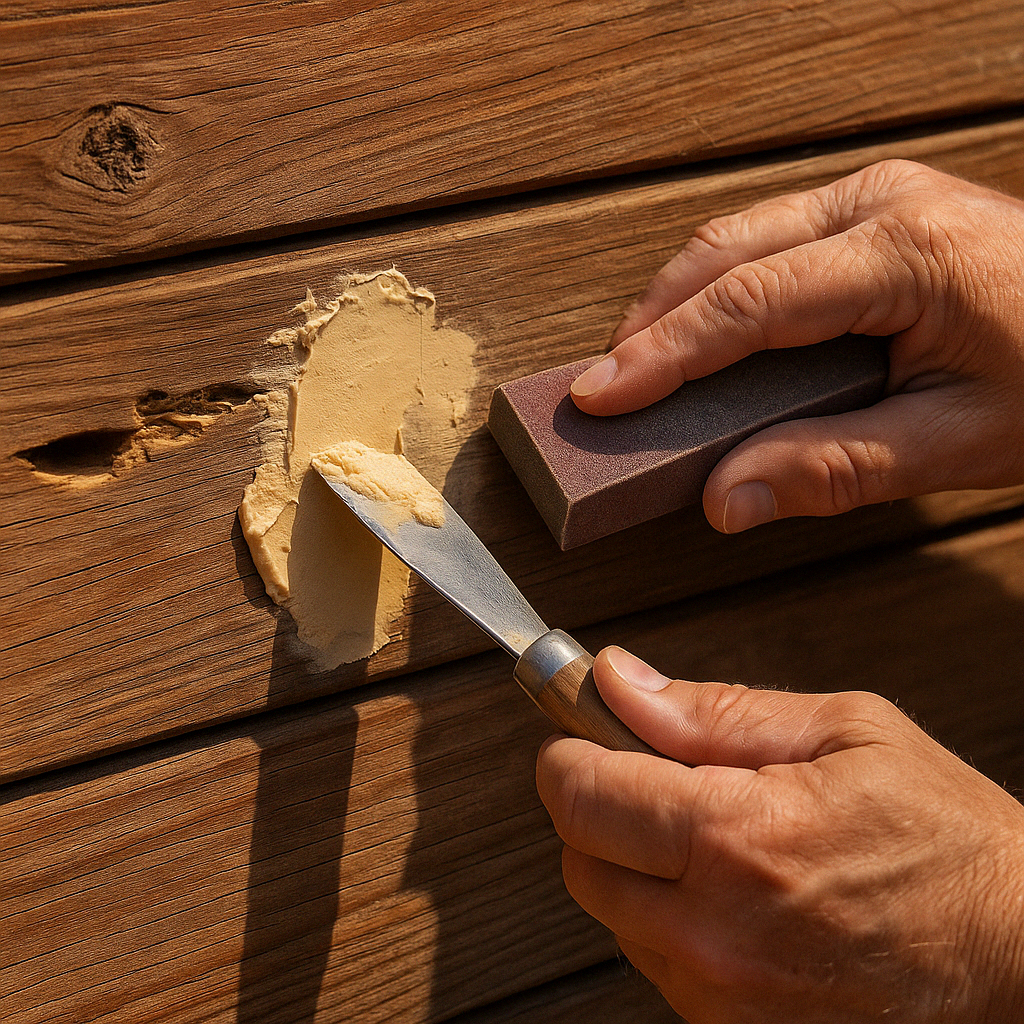
Filling depressions and cracks eliminates potential entry points that might attract carpenter bees scouting for easy drilling spots. Wood putty works wonders for small holes and imperfections. After it dries, sand the area smooth and apply your protective coating for complete protection.
Regular inspections should become part of your seasonal home maintenance routine. Early spring (before carpenter bee season kicks into high gear) and fall (to prepare for next year) are ideal times to give your property a thorough once-over. Pay special attention to wooden structures under eaves and in sheltered areas, looking for those telltale perfectly round holes about ½ inch in diameter and sawdust piles below them.
Preventive treatments applied before carpenter bee season begins can save you significant trouble down the road. Whether you opt for residual insecticides or natural repellents like citrus oil spray as part of your home treatment for carpenter bees strategy, consistent application according to product instructions is key.
A homeowner from Reading shared her success story with me recently: “After battling carpenter bees for three consecutive springs, I got serious about prevention. I painted absolutely everything – even the undersides of my deck boards – and religiously applied citrus oil spray every three weeks starting in early April. It’s been two years without a single carpenter bee hole!”
For those living in coastal Massachusetts communities like Lynn or Salem, be aware that your wooden structures face additional challenges. The increased moisture and weathering from salt air means more frequent maintenance may be necessary to keep carpenter bees from finding your property attractive.
With these preventive measures in place, you’ll be well on your way to keeping carpenter bees from turning your wooden structures into their personal condominiums. For more specialized advice or if you’re dealing with a persistent problem, check out our carpenter bee removal services in Waltham, MA.
Repairing Damage Caused by Carpenter Bees
Once you’ve successfully tackled your home treatment for carpenter bees, it’s time to roll up your sleeves and repair the damage they’ve left behind. This isn’t just about aesthetics—proper repairs prevent re-infestation and maintain your home’s structural integrity.
Home Repair Methods for Carpenter Bee Damage
Before grabbing your tools, make sure the bees have truly vacated the premises. Fall is usually the safest time for repairs, as bee activity has naturally ceased. If you’ve used treatments, give them time to work completely—rushing repairs might trap surviving bees inside, who’ll simply create new exit holes.
When you’re confident the galleries are empty, start with plugging those perfectly round entrance holes. Wood putty or wood filler works wonderfully for this job. For those deeper tunnels (remember, they can extend several feet!), consider injecting some expandable foam first before capping with wood filler. This provides solid support throughout the entire tunnel system.
“I was amazed at how much foam it took to fill one carpenter bee hole,” shares a homeowner from Lexington. “That’s when I realized just how extensive their tunnels really were inside my deck railing.”
Once your filler has completely dried according to the product instructions, grab your sandpaper. Sanding the repaired area creates a smooth, uniform surface that blends with the surrounding wood. Take your time with this step—a rushed sanding job can make repairs more noticeable than the original holes!
The final and perhaps most crucial step is applying a protective coating. Start with a quality primer on all repaired areas, then follow with exterior-grade paint or varnish. This isn’t just for appearances—it creates a barrier that carpenter bees strongly dislike, making your wood much less appealing for future generations of bees.
For wooden structures with extensive damage, particularly load-bearing elements, don’t hesitate to replace sections entirely. This is especially important when multiple galleries have compromised the wood’s structural integrity. Your family’s safety is worth more than saving a piece of damaged lumber.
Preventing Re-infestation After Repairs
Carpenter bees are creatures of habit—they love returning to the same areas year after year, and their offspring often target wood near existing galleries. This makes your post-repair prevention strategy just as important as the repairs themselves.
Regular monitoring should become part of your seasonal home maintenance routine, especially during spring and early summer when carpenter bees are house-hunting. I recommend walking your property with a cup of coffee on weekend mornings during bee season, specifically looking at previously damaged areas and other vulnerable wooden structures.
Keep those protective coatings fresh. Paint and varnish eventually wear down, especially in harsh New England weather. When you notice fading, peeling, or wearing of these protective layers, it’s time for a refresh. Bare wood is essentially a “welcome” sign for carpenter bees.
Consider applying preventive treatments to areas with a history of carpenter bee activity. Natural options like citrus oil sprays work well as short-term deterrents, while borate treatments penetrate the wood for longer-lasting protection. For severe or recurring problems, residual insecticides applied by professionals offer the most robust defense.
For stubborn trouble spots, physical barriers can be remarkably effective. A Burlington homeowner shared this clever solution: “After repairing the carpenter bee damage to my pergola, I installed small strips of metal flashing over the top edges where they had been boring. It’s been three years, and they haven’t returned to those areas.”
This approach works because carpenter bees prefer to start their galleries on the edges or undersides of wood. Metal flashing over these vulnerable areas makes them inaccessible to the bees. Similarly, fine mesh screens over ventilation areas prevent bees from finding entry points into your structures.
Homes in heavily wooded Massachusetts communities like Concord or Lexington often face higher carpenter bee pressure due to the natural habitat. If you live in these areas, your vigilance needs to match the liftd risk—more frequent inspections and maintenance may be necessary to keep these persistent pollinators from reclaiming their former homes.
While carpenter bees are beneficial for our gardens and environment, they don’t need to make your home their home. With proper repairs and preventive measures, you can appreciate these important pollinators from a distance that keeps your wooden structures safe.
Frequently Asked Questions about Home Treatment for Carpenter Bees
Can I effectively treat carpenter bees at home without professional help?
Yes, you absolutely can tackle moderate carpenter bee infestations on your own! Success with home treatment for carpenter bees in 2025 comes down to three key factors: correctly identifying the problem, timing your treatments right, and applying solutions properly.
For small to moderate infestations, DIY approaches can work wonderfully. Many homeowners find great success with citrus oil sprays that naturally repel these wood-boring bees. Dusting insecticidal powder directly into nest entrances can effectively eliminate bees already established in your wood. And don’t underestimate the power of well-placed carpenter bee traps – these simple devices can capture quite a few bees before they start drilling.
The secret to DIY success is consistency. Those natural repellents need regular reapplication, especially after it rains. And combining methods often works better than relying on just one approach. As Maria from Waltham told us, “I had the best results when I used traps to catch the existing bees while spraying citrus oil on my deck railings to keep new ones away.”
That said, there are definitely situations where calling in the professionals makes more sense:
When your home has widespread damage with numerous galleries throughout your wooden structures. When the bees have targeted structural elements that affect your home’s integrity. When you’ve tried DIY solutions for multiple seasons without success. Or when the nests are in places you simply can’t reach safely on your own.
A Waltham homeowner shared his experience: “I tried treating my carpenter bee problem myself for two seasons with limited success. When I finally called Waltham Pest Control, they identified nests I hadn’t even noticed and provided a comprehensive treatment that solved the problem.”
What is the best time to apply home treatments for carpenter bees?
Timing truly is everything when it comes to effective home treatment for carpenter bees. Think of it as a seasonal dance – you want to move in rhythm with the bees’ natural cycle.
Early spring (March-April in Massachusetts) is your golden opportunity for prevention. This is when you want to apply repellents and residual insecticides to potential nesting sites before the bees become active. Many successful homeowners make this part of their regular spring maintenance routine, treating vulnerable wood surfaces right alongside their spring cleaning.
When dealing with active nests, the evening hours are your friend. Carpenter bees return to their galleries at night, making this the perfect time to apply insecticides when they’re less active and more likely to be exposed to the treatment. As one pest control expert put it, “The best time to spray for carpenter bees is around night time when they are most likely resting in the holes.”
For repairs and sealing holes, wait until late summer or early fall. By this time, the current generation has emerged, but it’s before new bees seek overwintering sites. This timing minimizes the chance of trapping bees inside, which could lead them to create new exit holes or even tunnel into your home’s interior.
Here in Massachusetts, carpenter bees typically become active in April and May, with their busiest period in late spring and early summer. Planning your treatment schedule around this natural cycle dramatically increases your chances of success.
Are natural remedies effective for carpenter bee infestations?
Natural remedies can absolutely work for home treatment for carpenter bees, especially if you’re dealing with prevention or catching an infestation in its early stages. These gentler solutions appeal to many homeowners who prefer to avoid harsh chemicals around their families, pets, and gardens.
Citrus oil spray stands out as a fan favorite among natural deterrents. The strong citrus scent that we humans find so pleasant is actually quite repulsive to carpenter bees. Almond oil mixtures and essential oil blends featuring tea tree, lavender, citronella, or eucalyptus have also proven effective at keeping these wood-boring bees at bay.
The trade-off with natural solutions is frequency of application. While chemical treatments might last for weeks, natural repellents typically need refreshing every few days, especially after rain washes them away. One study found that “non-toxic methods can reduce infestations by 90%+” when applied consistently and as part of a comprehensive approach.
Sarah from Lexington shared her success story: “I was concerned about using chemicals around my children and pets, so I tried the citrus oil spray. I applied it every three days to my deck railings during spring, and it kept the carpenter bees away completely. I was impressed with how well a natural solution worked.”
For the best results with natural remedies, timing and consistency are key. Start early before carpenter bee season begins in earnest. Apply your chosen treatments regularly and don’t skip sessions. Combine these repellents with physical prevention like painting or sealing wood surfaces. And always keep extra solution on hand to reapply after rainstorms wash away your previous applications.
Many homeowners find that this natural approach aligns perfectly with their overall home maintenance routine – just another way of caring for their property while respecting the environment around them.
Conclusion
Tackling carpenter bees effectively isn’t about quick fixes—it’s about understanding these fascinating insects and implementing a thoughtful, multi-layered approach. With the right home treatment for carpenter bees strategies in 2025, you can protect your wooden structures while still respecting the ecological role these important pollinators play.
After helping Massachusetts homeowners deal with carpenter bees for over four decades, I’ve found that success comes down to a few critical principles:
Early detection and action make all the difference. Those perfect little holes might seem harmless at first, but they’re just the tip of the iceberg. Inside your wooden structures, carpenter bees could be creating extensive tunnel systems that weaken integrity over time. Addressing the problem at the first sign of activity can save you significant repair costs down the road.
Prevention truly is your best defense. Taking time to paint or seal exposed wood surfaces, conducting regular inspections of vulnerable areas, and applying deterrents before carpenter bee season begins can dramatically reduce your chances of infestation. Many homeowners tell me they haven’t seen carpenter bees return after implementing comprehensive preventive measures.
Combined approaches yield the best results. Rather than relying solely on one treatment method, homeowners who experience lasting success typically use a combination of strategies—perhaps natural repellents for prevention, traps for population reduction, and targeted treatments for active galleries. This comprehensive approach addresses the problem from multiple angles.
Proper repair work breaks the infestation cycle. Simply filling holes without ensuring bees are eliminated first, or neglecting to apply protective coatings afterward, often leads to re-infestation. Taking the time to repair damage correctly helps prevent future problems.
While many home treatment for carpenter bees methods are effective for moderate infestations, some situations call for professional intervention. If you’re dealing with extensive damage, nests in structural elements, hard-to-reach galleries, or persistent problems despite your best DIY efforts, it’s probably time to call in the experts.
At Waltham Pest Control, we bring specialized knowledge and professional-grade solutions to carpenter bee problems throughout Eastern Massachusetts. Our licensed technicians can assess the full extent of your infestation (often identifying nests that homeowners miss) and provide targeted treatments that eliminate carpenter bees while keeping your family and property safe.
For more information about our carpenter bee services in Waltham and surrounding communities, visit our carpenter bee information page.
By taking a thoughtful, proactive approach to carpenter bee management, you can enjoy your deck, porch, fence, and other wooden structures without constant worry about buzzing visitors drilling new homes into your property. With the right knowledge and tools—whether DIY or professional—you can effectively manage carpenter bees and protect your home for years to come.
